top of page

Write a Title Here

This is a space to welcome visitors to the site. Grab their attention with copy that clearly states what the site is about, and add an engaging image or video.

Explore
Trusted By:

From Concept To Reality

Manage Projects And Cast Artists With Ease!

Find artists, launch projects, and manage applications — all in one powerful place. Focus on what matters. We’ll handle the rest.

THE PENDING
AGENCY

BOOK SMART. MANAGE BETTER.

THE PENDING
AGENCY

THE PENDING
AGENCY

BOOK SMART. MANAGE BETTER.

BOOK SMART.
MANAGE BETTER.

Trusted by:

Trusted By :

FROM CONCEPT TO REALITY:  

MANAGE PROJECTS AND CAST ARTISTS WITH EASE!

Find artists, launch projects, and manage

applications — all in one powerful place.

Focus on what matters. We’ll handle the rest.

30% faster casting and application management.

MANAGE PROJECTS AND
CAST ARTISTS WITH EASE!

FROM CONCEPT
TO REALITY:  

Meet some of the extraordinary artists featured on The Pending Agency!

FROM CONCEPT TO REALITY:  

MANAGE PROJECTS AND CAST ARTISTS WITH EASE!

Find artists, launch projects,

and manage applications —

all in one powerful place.

Focus on what matters.

We’ll handle the rest.

30% faster casting and application management.

MANAGE PROJECTS AND
CAST ARTISTS WITH EASE!

FROM CONCEPT
TO REALITY: 

FROM CONCEPT TO REALITY:  

MANAGE PROJECTS AND CAST ARTISTS WITH EASE!

Find artists, launch projects, and manage

applications — all in one powerful place.

Focus on what matters. We’ll handle the rest.

30% faster casting and application management.

MANAGE PROJECTS AND
CAST ARTISTS WITH EASE!

FROM CONCEPT
TO REALITY:  

FROM CONCEPT TO REALITY:  

MANAGE PROJECTS AND CAST ARTISTS WITH EASE!

Find artists, launch projects, and manage

applications — all in one powerful place.

Focus on what matters. We’ll handle the rest.

30% faster casting and application management.

Bildschirmfoto 2025-07-08 um 14.49.32.png

Thousands of artists.
One smart search.

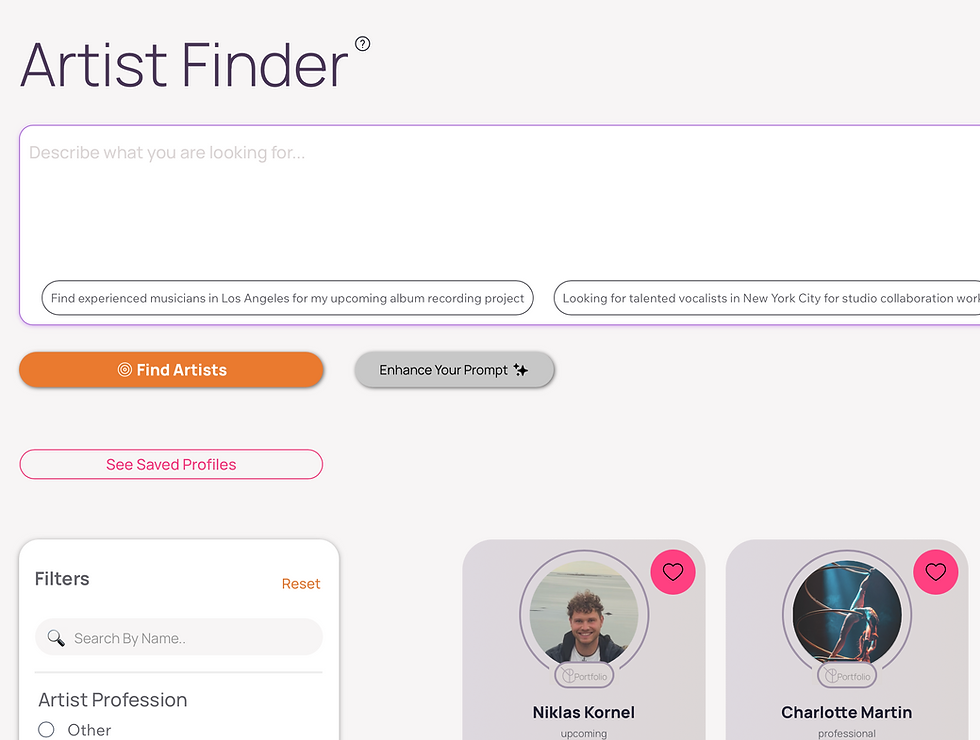
Our Artist Finder combines verified portfolio profiles with powerful AI to help you find the right talent — fast. No agency fees — communicate and set pricing directly with the artist. Whether you search our curated user base or tap into millions of extended-network contacts, you’ll see real artists, accurate information, and results that match your vision.

Smart, scalable, intuitive. 

Millions of artists.
One smart search.

Our Artist Finder combines our verified portfolio profiles with powerful AI to help you discover the right talent — fast. Whether you're looking among our curated user base or exploring millions of extended network contacts, the search is smart, scalable, and intuitive. No feeds, no noise — just real artists, real data, and results that match your vision.

Try it yourself!

Artists organized
Emails powered.
Workflows simplified.

The Pending Artist Manager — Effortlessly organize your artist roster and contacts, assign profiles to projects or lists, attach notes and ratings, export CSVs, and send personalized or mass AI-powered emails instantly—all from one intuitive platform.

Build projects.
Manage applications.
Cast smarter with AI.

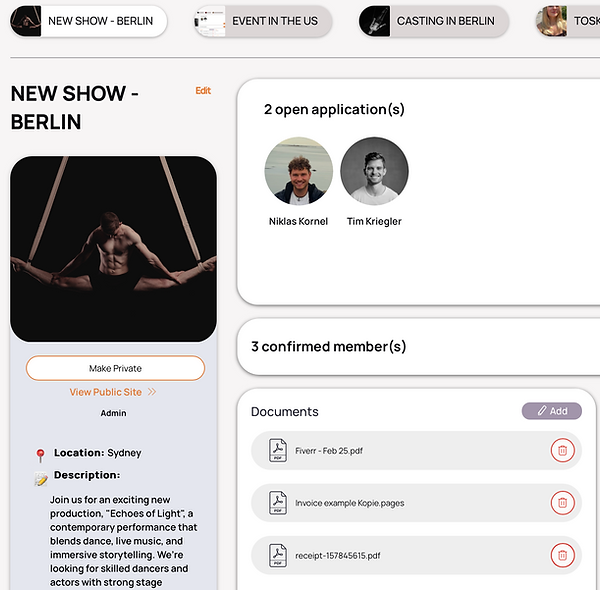
Create & publish projects to receive applications directly through your branded landing page. Generate a project-specific email address to keep your inbox clean and organized. On your project dashboard, store moodboards, files, and notes — everything in one spot.  Let AI help you prioritize incoming applications based on your requirements, and handle communication effortlessly:

send automated, personalized replies in seconds. Casting has never been this smooth.

Why We Safe You
Time & Money: 

  • Smart search. Instant results.

  • Verified artist profiles.

  • Contact directly — no middlemen or agency fees.

A Network Of Millions

  • Publish projects and receive applications.

  • Custom project landing page &         link to share

  • One inbox, no chaos — project    emails only.

  • Reply in seconds with AI-powered messages.

Smart Application Flows

  • AI highlights top matching applications

  • Instant talent prioritization

  • Custom replies based on fit

  • Faster decisions, less manual sorting

AI Assisted Evaluation

  • Send bulk replies in seconds

  • Customized content for each applicant

  • AI writes messages based on application data

  • Keep it personal — even at scale

Personalized Mass Mails

  • Centralize all artist info in one     secure place

  • Keep detailed records with notes,  files, and ratings

  • Easily access and update profiles anytime, anywhere

Data Storage

  • Invite team members with           custom permissions

  • Share notes, files, and ratings in       one place

  • Work together on projects and applications

Collaboration With Your Team

Convince Yourself & Try For Free!

Artists organized.
Emails powered.
Workflows simplified.

The Pending Artist Manager — Effortlessly organize your artist roster and contacts, assign profiles to projects or lists, attach notes and ratings, export CSVs, and send personalized or mass AI-powered emails instantly—all from one intuitive platform.

Bildschirmfoto 2025-06-29 um 17.43.17.png
Bildschirmfoto 2025-06-29 um 17.41.07.png

Build projects.
Manage applications.
Cast smarter with AI.

Create and publish projects to receive applications directly through your branded landing page. Generate a project-specific email address to keep your inbox clean and organized. On your project dashboard, store moodboards, files, and notes — everything in one spot. Let AI help you prioritize incoming applications based on your requirements, and handle communication effortlessly: send automated, personalized replies in seconds. Casting has never been this smooth.

Pink Poppy Flowers

Different Paths — One Smart System.
Your Smart System.

Pink Poppy Flowers

Different Paths —
One Smart System.


Your Smart System.

A Network
Of Millions

  • Smart search. Instant results.

  • Verified artist profiles.

  • Contact directly — no middlemen or agency fees.

Why We Safe You Time & Money:

Smart
Application Flow

  • Publish projects and receive applications.

  • Custom project landing page & link to share

  • One inbox, no chaos —           project emails only.

  • Reply in seconds with                       AI-powered messages.

Personalized Mass Mails

  • Send bulk replies in seconds

  • Customized content for each applicant

  • AI writes messages based on application data

  • Keep it personal — even at scale

AI Assisted Evaluations

  • AI highlights top matching applications

  • Instant talent prioritization

  • Custom replies based on fit

  • Faster decisions, less manual sorting

Collaboration With Your Team

  • Invite team members with custom permissions

  • Share notes, files, and ratings in one place

  • Work together on projects and applications

Data Storage

  • Centralize all artist info in one secure place

  • Keep detailed records with notes, files, and ratings

  • Easily access and update profiles anytime, anywhere

Convince Yourself & Try For Free!

Benefit form our Pioneer Programm and use our services for free for the first 6 months!

Convince Yourself & Try For Free!

Benefit form our Pioneer Programm and use our services for free for the first 6 months!

Data Storage

  • Centralize all artist info in one secure place

  • Keep detailed records with notes, files, and ratings

  • Easily access and update profiles anytime, anywhere

Collaboration With Your Team

  • Invite team members with custom permissions

  • Share notes, files, and ratings in one place

  • Work together on projects and applications

AI Assisted Evaluations

  • AI highlights top matching applications

  • Instant talent prioritization

  • Custom replies       based on fit

  • Faster decisions, less manual sorting

Personalized Mass Mails

  • Send bulk replies in seconds

  • Customized content for each applicant

  • AI writes messages   based on application data

  • Keep it personal —         even at scale

Smart
Application Flow

  • Publish projects and receive applications.

  • Custom project landing page & link to share

  • One inbox, no chaos —    project emails only.

  • Reply in seconds with      AI-powered messages.

A Network
Of Millions

  • Smart search. Instant results.

  • Verified artist profiles.

  • Contact directly — no middlemen or agency fees.

What Our Clients Say

What Our Clients Say

Bildschirmfoto 2025-05-29 um 17.40.26.png
Bildschirmfoto 2025-07-30 um 15.54.08.png

Alina Shevchenko
SheVisions Productions

From finding artists to managing my roster and applications - This is by far the most time saving tool  I have used so far!

Bildschirmfoto 2025-07-30 um 15.58_edited.jpg

Nadja Berger
Young Stage Festival

More to come soon!
Stay tuned for Young Stage x The Pending at our 2025 Festival this September!
Bildschirmfoto 2025-07-30 um 16.18_edited.jpg

Sonam Sharma
GAAS Media

The Pending Agency completely transformed the way I manage applications and communication for large projects. It’s easy, fast, and everything’s in one place.

A Unique Offer To Our Early Users

Join Our Early User Program Now and Benefit For 2 Years!

A Unique Offer To Our Early Users

Join Our Early User Program Now and Benefit For 2 Years!

A Unique Offer To Our Early Users

Join Our Pioneer Program Now and Benefit For A Lifetime!

A Unique Offer To Our Early Users:

Join Our Early User Program Now and Benefit For 2 Years!

  • What Is The Artist Finder?
    The Artist Finder helps you discover the right artists in seconds — from search to shortlist with ease. Access a global talent pool with locally relevant results. Use AI-powered filters by style, medium, and region to find full artist profiles complete with contact info, portfolios, and socials instantly. Book directly with no agency fees, save favorites for your team or clients, and build your own custom artist pools for every project.
  • How Do I Find The Right Artists?
    At the top of the Artist Finder page, type your prompt or criteria describing the artist you need—include details like style, skills, medium, location, or project requirements. When you hit the “Find Artists” button, the system first shows all matching artists registered with us, giving you trusted, verified profiles upfront. After that, it displays global results from our AI-powered search, finding the best additional matches worldwide that fit your request. This way, you get a comprehensive and reliable selection of artists tailored to your needs. Step-by-step summary: Go to the Artist Finder page and locate the search box at the top. Enter a detailed description of the artist you’re looking for (style, skills, location, etc.). Click the “Find Artists” button to start the search. View the results: first, artists registered with us; then, global AI-powered matches.
  • How does the searching algorithm work?
    First, our AI looks for artists registered with us who have completed their portfolios and match your search criteria. These verified artists are always shown at the top of your results and are clearly marked for easy identification. After that, the AI expands its search globally, finding additional artists who fit your criteria. It filters and presents their profiles along with available contact details to give you a complete and relevant selection. Step-by-step summary: AI searches our database for registered artists with completed portfolios that match your criteria. These verified artists appear first in your search results, clearly marked. AI then performs a global search for other artists matching your criteria. The system filters and organizes global profiles, including contact information. You receive a combined, prioritized list of local verified and global matching artists.
  • How can I Safe The Artists I Like?
    On every artist card, you’ll find a heart-shaped icon. Click the heart to save that artist’s profile to your Profile Manager. This lets you easily access and manage all your favorite artists anytime, keeping your selections organized and ready for future projects. Step-by-step guide: Browse artist cards in the Artist Finder or search results. Click the heart icon on any artist card you want to save. The artist is automatically added to your Profile Manager. Go to your Profile Manager to view, organize, or manage your saved artists whenever you like.
  • How can I Auto Generate E-Mails?
    To auto-generate an email, start by inserting your prompt in the upper section or input field. Describe the purpose of your message and any key information you want to include—like the recipient’s name, project details, or specific requests. Once you enter this basic input, click “Generate” to create a draft email text automatically. You can then review and make any adjustments needed before sending it out. Step-by-step guide: Open the email generation tool in your dashboard. Insert your prompt in the upper input field, describing the email’s purpose and including important details (e.g., recipient, project name, tone). Click the “Generate” button to create a draft email. Review and edit the generated text if needed. Send the email directly from the tool when you’re ready.
  • How can I filter results and artist cards?
    You can filter our own database of registered users either before you start an AI search or after to refine the results. Use the filter bar on the left side to select criteria like style, skills, location, and more. This helps you narrow down both your local trusted artist pool and the broader global AI-powered results to find exactly who you need. Step-by-step guide: Use the filter bar on the left side of the Artist Finder page. Apply filters to browse only artists registered with us before running an AI search, or use filters after to refine AI-generated global results. Select options like style, region, skills, or other relevant criteria. View and browse the filtered list, combining local registered artists and global matches. Adjust filters anytime to expand or fine-tune your search.
  • What Is The Profile Manager?
    Your Profile Manager is your smart, simple, and complete artist database — finally organizing your entire artist roster in one place. Easily manage centralized profiles packed with documents, notes, and ratings. Say goodbye to tedious copy-pasting with AI-assisted group emails. Assign artists to projects seamlessly and communicate efficiently. Plus, export CSV lists for juries and clients whenever you need.
  • How Do I Edit An Artist Card?
    To make changes to an artist card, look to the right side of the card where you’ll find a small menu with action buttons. Click the “EDIT” button to open the editor view. From there, you can update any details connected to that card. This helps you keep your artist information accurate and up to date at all times. Step-by-step summary: Locate the artist card you want to edit. On the right side of the card, find the menu with action buttons. Click the “EDIT” button. Make your changes in the editor view Save your updates — the changes are applied immediately.
  • How Do I Add An Artist Card Manually?
    To add an artist manually to your project, go to the left-hand menu and click the button labeled “Add User Manually.” A form will appear where you can enter all relevant information about the artist you’d like to include — such as name, role, contact details, notes, and more. Once saved, the artist card will appear in your dashboard just like any other, ready to be managed and updated. Step-by-step summary: In your Project Dashboard, find the left-hand menu. Click the “Add User Manually” button. Fill in the artist’s details (name, role, contact, notes, etc.). Click “Save” to create the artist card. The new card will appear and can be edited or assigned like any other.
  • How Can I Filter Artists Cards?
    To quickly find what you need, use the dropdown filter in the top-right corner of the page. This lets you filter artist cards by different categories — such as those attached to specific lists or projects, favorited profiles, manually added cards, and even pending profiles with a portfolio. This helps you keep your view focused and organized, especially when managing larger teams or complex casting calls. Step-by-step summary: Go to the page where your artist cards are displayed. Locate the dropdown filter in the top-right corner. Choose your filter criteria (e.g., Confirmed, Favorized, Manually Added, with Portfolio, etc.). The view will update to show only the matching cards. Switch or clear filters anytime to adjust your view.
  • How Do I Add Artist Cards To A Project?
    First, make sure you’ve already created a project. Then, go to your list of artist cards and select the ones you want to add by clicking the small checkbox in the top-right corner of each card. Once selected, head to the menu on the left-hand side and click “+ Add to Projects.” Choose the project you want to assign them to and click “Add.” The selected artist cards will now be included in your project cast or team as confirmed members. Step-by-step summary: Make sure your project has been created. Go to your artist cards and select one or multiple cards using the checkbox in the top-right corner of each card. On the left-hand side, click “+ Add to Projects.” Choose the project from the dropdown list. Click “Add” — the cards are now part of your project cast/team.
  • How Do I Send Mails to Multiple Users at the Same Time?
    To contact multiple artists at once, start by selecting the artist cards you want to message. You can either select them manually using the checkboxes on each card, or use the “Select All” option in the left-hand menu. Then, click “Send Mail” from the same menu. If you activate the “Send individual mails” option, each message will be personalized based on the artist’s card — including details like name, role, or notes. You’ll be able to review and refine each email individually using the Nextand Previous buttons under the text field before sending. This ensures every message feels tailored, even when messaging in bulk. Step-by-step summary: Select individual artist cards or click “Select All” in the left-hand menu. Click “Send E-Mail To Selected” from the left-hand menu. Enable “Send individual mails” for personalized messages. Use Next and Previous to review and edit each email before sending. Click “Send” when you're ready — each artist receives a personalized message.
  • How Do I Share Artist Cards / Profiles With Others?
    To share artist profiles with clients, teammates, or collaborators, first select the artist cards you want to share. You can do this by clicking the small checkbox in the top-right corner of each artist card. You can select as many cards as you want to share. Once your selection is complete, go to the left-hand menu and click “Share Selected.” Then, enter the recipient’s email address — they’ll receive an email containing the names and direct links to each artist’s portfolio on our website, giving them a clear overview of your selected candidates. If the email belongs to a registered user of our agency, the shared profiles will also appear directly in their Profile Manager, marked as “Shared by [Your Name]”, with the option to import them into their own projects or lists. Step-by-step summary: Click the checkbox in the top-right corner of each artist card you want to share. Select multiple cards as needed. In the left-hand menu, click “Share Selected.” Enter the recipient’s email address and click "Share As Mail The recipient receives an email with names and portfolio links. If they are a registered user, click "Share In Agency" - profiles will appear in their Profile Manager with a “Shared by” label and import option.
  • How Do I Import Shared Profiles?
    When you see artist profiles marked with “Shared by [Name]”, these are profiles that others have shared with you. To add a copy of any shared profile to your own Profile Manager, simply click the “Import” button located right below the artist card. This will create a duplicate of the artist card in your manager, including all profile information—however, attached documents are not included in the import. After importing, it’s a good idea to delete the original shared card to avoid duplicates and keep your Profile Manager organized. Step-by-step summary: Look for artist cards labeled “Shared by [Name]” in your Profile Manager. Click the “Import” button below the card to duplicate it in your own manager. Note that attached documents are not imported. Delete the shared card afterward to avoid duplicates.
  • Do Artists See Notes and Ratings on Their Cards?
    No, all notes, ratings, and internal information on artist cards are only visible to you and your team. Artists do not have access to these details, so you can freely manage and evaluate profiles privately without impacting the artist’s view of their own information.
  • What Is The Project Dashboard?
    Your Project Dashboard is the place where you bring everything together. It’s where you create and manage your projects, track applications, and collaborate with your team — all in one clear, organized space. Whether you're casting for a single show or juggling multiple productions, your dashboard helps you stay in control and keep things moving smoothly.
  • How Do I Add a Project?
    To create a new project, go to the top-left corner of your screen and click the “Add Project” button. A form will open where you can enter all relevant details — such as title, description, roles, deadlines, and more. If you plan to make the project public, it’s best to include as much detail as possible so artists and collaborators can clearly understand the scope. Once you're done, click “Create Project” — your project will be added to your dashboard. If you need to update any of the details later, just click “Edit Project” on the right side within the section that displays all your project information. Step-by-step summary: Click “Add Project” in the top-left corner. Fill in project details (title, description, roles, deadlines, etc.). Be detailed if you plan to publish the project publicly. Click “Create Project” to save it. View the project summary in the overview bar at the top of the Project Manager. To make changes later, click “Edit Project” on the right side of your project info section.
  • How Do I Set A Project To Public And What Does It Mean?
    To make a project public, open your project and look at the right side of the project information section. Just below the “Edit Project” button, you'll find the option to set the project to public. Click it to activate public visibility. Once public, your project gets its own landing page with all the details you've provided. This means that visitors on The Pending Agency and The Pending App users can view your project and apply either via the project email or directly with their portfolio — depending on how you’ve set it up. All applications will be received in the Application Manager of your project, where you can review, sort, and respond to submissions with ease. You can also share the link to your project landing page or your project email to your own audience. Step-by-step summary: Open your project and go to the right side of the info section. Click “Set Project to Public” (just below the “Edit Project” button). A public landing page is created automatically. Artists on The Pending can apply via email or portfolio. Share link or project e-mail to your own audience for wider reach Applications are received in the Application Manager of your project.
  • How Do I Add Notes And Documents To A Project?
    To add internal notes or upload important documents to a project, scroll to the bottom of your project summary box and click the “Add Notes and Documents” button. A dedicated box will open where you can type in your notes and attach files using the upload button at the bottom. This is perfect for storing creative references, contracts, casting notes, or anything your team needs to access during the project. Step-by-step summary: Scroll to the bottom of the project summary box. Click “Add Notes and Documents.” Type your notes directly into the field. Use the upload button at the bottom to attach documents. All added content stays internal and is visible only to you and your team.
  • How Do I Add Images Or A Moodboard To A Project?
    To upload visual references or build a moodboard, go to the Moodboard section of your project and click the “+” icon next to the Moodboard headline. Select the images you want to upload — note that only image files are supportedhere. If you want to upload PDFs, contracts, or other file types, please use the “Add Notes and Documents” section instead. To delete images from the moodboard, simply click the “–” icon and then select the ones you'd like to remove. Step-by-step summary: Go to the Moodboard section in your project. Click the “+” icon next to the Moodboard headline. Select and upload your image files. For non-image files (PDFs, etc.), use the Notes and Documents section. To delete images, click the “–” icon and select the ones to remove.
  • Where Do I See Artists Assigned To My Project?
    To view the artists assigned to your project, click on the “Confirmed Members” button within your project. You will be automatically forwarded to a dashboard displaying all the corresponding artist cards. From this dashboard, you can easily manage, edit, and update the artist profiles as needed. Step-by-step summary: Open your project and click on “Confirmed Members.” You’ll be taken to the dashboard with all assigned artist cards. Manage and edit artist profiles directly from there.
  • Where Do I See New and Old Applications For My Project?
    To view all applications for your project, click the “View Applications” button within the project view. This will take you directly to the Application Manager specific to your project, where you can review, manage, and update the status of each application. New applications are clearly highlighted both on your project overview bar and just above the “View Applications”button, so you’ll always know when new submissions arrive. Step-by-step summary: Open your project and click “View Applications.” You’ll be taken to the Application Manager for that project. Manage and update application statuses there. New applications show highlights on the project overview and above the button.
  • How Do I Delete A Project?
    To delete a project, open the project and look at the project overview/summary section on the right side. There, you’ll find a delete icon or button. Click it to start the deletion process. You will be asked to confirm this action — please note that deleting a project is final and cannot be undone. Step-by-step summary: Open your project and go to the overview/summary section on the right. Click the delete icon/button. Confirm that you want to delete the project. The project and all its data will be permanently removed.
  • What Is The Application Manager
    The Application Manager is your central hub for managing all incoming applications to your projects. Here, you can easily keep an overview of every applicant, change their application status (e.g., pending, accepted, rejected), and interact directly via email — all within one place. For each project, you can create a project-specific virtual email address so that applications sent there arrive directly in the system, keeping everything organized and accessible. The Application Manager also offers AI-powered mail tools and mass communication features, allowing you to send personalized or bulk messages quickly and efficiently. This helps you stay responsive and maintain smooth communication with artists throughout the process.
  • How Can I Filter or Adapt My Application Dashboard?
    To keep a clear overview of your incoming applications and easily manage their status, simply use the filter options on the left-hand side of your Application Manager. You can filter by status—such as: Confirmed Rejected Pending / In Discussion This helps you focus only on the applications you want to review or follow up on, and ensures your dashboard stays organized and efficient.
  • How Do I Create A Project-Specific Application Mail?
    A project-specific application mail is a unique email address linked to your project that applicants use to send their applications. These applications automatically arrive in your Application Manager for easy handling. To create your project’s application mail: Click on “Manage Application Mail” in the left-hand menu. Set up a custom email address for your project. Enter a forwarding email where you want to receive notifications whenever a new application arrives via this project mail. Once set, all applications sent to this project-specific email will be automatically organized in your Application Manager, keeping your workflow smooth and centralized. Step-by-step summary: Go to “Manage Application Mail” in the left menu Create your project’s unique application email address Set a forwarding email for notifications Applications sent here land automatically in your Application Manager
  • How does AI help evaluate incoming applications?
    Our built-in AI automatically analyzes each application based on your project description and general criteria—such as experience, references, and relevance to the role. This allows you to: Instantly assess how well an applicant matches your needs Save time by skipping manual evaluation Make faster, more informed decisions based on relevant criteria Get consistent, objective overviews across all applications The more detailed your project info, the more accurate the analysis.
  • Where can I see the AI-generated rating or analysis?
    The AI rating and summary are shown directly inside the applicant’s profile within the Application Manager. Each application includes: A written summary with professionalism and project fit scores Overall rating and recommendation Key strengths and improvement areas Identified skills and attachment analysis
  • How Do I Change the Status of an Application?
    To update the status of an application, go to your project’s Application Manager. New applications will be highlightedso you can easily identify them. Click “Manage Application” on the artist’s card to open the detailed view. At the top, you’ll find three status options: Confirm – to accept the artist into your project In Discussion – to keep them under consideration Reject – to decline the application Once you click Confirm, the profile will be automatically added to your project’s Confirmed Members, making them part of your team or cast for that project. Step-by-step summary: Go to your project’s Application Manager Look for highlighted new applications Click “Manage Application” on the artist’s card Choose Confirm, In Discussion, or Reject Confirmed profiles are automatically imported into your Confirmed Members list
  • How Do I Send (Mass) Emails To Applicants?
    If you want to email one person directly, go to the Application Manager, click “Manage Application” on their card, then use the email button to write and send a message just to them. To contact multiple applicants at once — whether to send confirmations, rejections, or follow-up questions — start by selecting the profiles you want to correspond with from your Application Manager. Then, click “Manage Selected” and choose the mailing option that fits your purpose. You can choose to: Send the same email to everyone (default setting), or Send personalized emails based on each application by toggling the “Send Individual Mails” setting. You can either: Write your message manually in the text field, or Use the AI prompt field above to generate a smart email draft, which you can review and edit before sending. When using “Send Individual Mails”, you can edit each personalized email before sending by using the “Previous”and “Next” buttons below the text field to navigate between messages. Once you’re happy with your message(s), simply click “Send” to deliver them to all selected recipients. Step-by-step summary: For a single mail: click “Manage Application” then use the email button Select the applications you want to message Klick “Manage Selected” and choose a mail option Decide between default (same mail to all) or “Send Individual Mails” Enter your message manually or generate one via AI Use “Previous” / “Next” to edit each message if sending individually Review and click “Send”
bottom of page